PRODUCT GUIDE · UPDATED AUGUST 10, 2026

SignalForge Recovery EA: setup & inputs guide (MT5)

The complete walkthrough for SignalForge Recovery v3.24: install it from MQL5 Market, quickstart with the Guardian presets, configure the four inputs that matter first, and read every group of the F7 panel with real screenshots — including the EXIT COST BUFFER (anti-drain), ZONE dual-side grid, CONTROL take-over mode and daily loss breaker. New to the product? Start with the SFRecovery EA product page or the MQL5 Market listing ($30 one-time, free Strategy Tester demo).

BBenjamin SF · Founder Published Jul 31, 2026 Read 12 min
Quick answer

SignalForge Recovery is a position manager for MT5: it has no entry signal. Install it from MQL5 Market, attach it to the chart of the symbol in drawdown, load a Guardian preset, then set your magic numbers, the loss trigger ("Launch when floating loss >= $"), the basket target ("Close whole basket at this PROFIT") and the hard cap ("Hard kill: flatten basket if loss >= $"). $30 one-time, no subscription, no token.

01

Step 1 — Install from MQL5 Market

SignalForge Recovery is sold only on the MQL5 Market as a $30 one-time purchase — no subscription, no license token, nothing to whitelist. In MetaTrader 5 open the Market tab, go to Purchased and click Install next to SignalForge Recovery. The EA appears in the Navigator under Expert Advisors.

Before buying you can run the free Strategy Tester demo straight from the Market listing — section 06 below explains exactly what the demo does (and what it does not).

02

Step 2 — Attach to a chart + quickstart with the Guardian presets

Drag the EA onto the chart of the symbol you want it to manage. One chart per symbol: the EA only manages positions of the symbol of the chart it is attached to. Make sure AutoTrading is enabled (the green button in the MT5 toolbar).

The fastest correct setup is a Guardian preset: press F7Load → pick the .set file → OK. The presets are calibrated for a 10,000 USD account:

XAUUSD Guardian (0.01 lot) · XAUUSD 10k .set · CONTROL 10k

A hedging account is recommended: the lock and the pair-based partial close need opposite positions to coexist. On netting accounts both features auto-disable (details in the FAQ).

03

Step 3 — The 4 inputs to configure first

The EA ships with sane defaults, but these four decide what it manages, when it starts, where it exits and how much it can lose. Set them before anything else.

Input
Default
What it does
Magic numbers to recover
InpMagicForRecovery
"0"
Which positions the EA manages. "0" = your manual trades; a comma-separated list of magic numbers makes it watch other EAs too.
Launch when floating loss >= $
InpDDMoney
50
Launch trigger: the recovery cycle starts when the floating loss reaches this many dollars. 0 = disabled (you can also trigger by equity DD % with "Activate at DD %").
Close whole basket at this PROFIT
InpBasketMoney
60
Exit target: the whole basket closes when its combined P/L reaches break-even + this amount (swap included, commission too if "Include broker commission in P/L check"). Lower = exits closer to break-even.
Hard kill: flatten basket if loss >= $
InpMaxLossMoney
0 (off)
Hard $ cap on the managed basket's loss: flattens everything. Ships disabled — this is the protection to configure first.
Sizing warning — absolute dollars

"Launch when floating loss >= $", "Close whole basket at this PROFIT" and "Hard kill: flatten basket if loss >= $" are absolute $ amounts. The Guardian preset is calibrated for 0.01 lot on XAUUSD on a 10,000 USD account; if you manage 10x that size, multiply those three values by 10.

The full input tour (F7 panel)

EVERY GROUP OF THE SETTINGS WINDOW, WITH THE REAL SCREENSHOTS. DEFAULTS VERIFIED AGAINST v3.24.

A

Orders to recovery + Launch settings

What the EA manages and when a cycle starts. The losing side is auto-detected (the side with the bigger floating loss) and only that side is averaged; opposite-side positions are consolidated (closed) at launch.
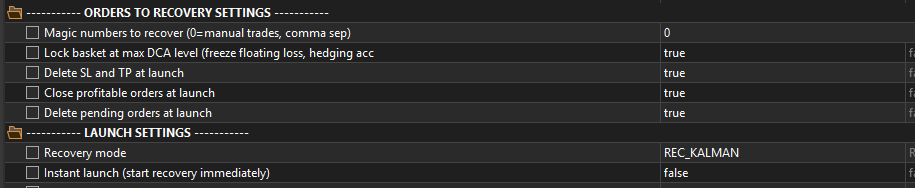
F7 inputs panel: Orders to recovery settings and Launch settings
F7 → ORDERS TO RECOVERY SETTINGS + LAUNCH SETTINGS
Input
Default
What it does
Magic numbers to recover
InpMagicForRecovery
"0"
Positions to manage: "0" = manual trades; comma-separated magics to watch other EAs.
Lock basket at max DCA level
InpUseLock
true
At max DCA level, opens an opposite position sized to net exposure: freezes the floating loss, does not remove it (swap/commissions keep accruing; the basket becomes delta-neutral). Hedging accounts only; auto-disabled on netting.
Recovery mode
InpMode
REC_ATR
Grid mode: FIXED (fixed step), REC_ATR (ATR-scaled step), REC_KALMAN (ATR step + trend filter on new initial entries). REC_OFF disables the EA.
Instant launch
InpInstantLaunch
false
true = start the cycle as soon as the EA is attached, without waiting for the threshold.
Activate at DD %
InpDDPercent
0
Launch trigger by equity drawdown in %. 0 = disabled.
Launch when floating loss >= $
InpDDMoney
50
Launch trigger by floating loss in $. 0 = disabled. With both triggers at 0 the cycle never starts (unless Instant launch).
Absolute close at DD %
InpAbsoluteClose
0
Closes everything and stops the EA permanently at the given equity DD %.
Launch only after N bars with no new extreme
InpLaunchPullbackBars
0
New in v3.14. When the trigger fires, the cycle waits until price stops making new lows (losing BUY) or new highs (losing SELL) for N bars before averaging - no buying a free fall. 0 = launch immediately (current default; backtests show N=3 HURTS performance, keep it off).
B

Circuit breaker + Take profit and partial close

The three-tier equity protection and the exit engine. Partial closes are pair-based: a profitable recovery leg is paired with the worst losing leg and a chunk of both is closed only when the pair nets ≥ +$0.10 — every partial books a net gain by construction.
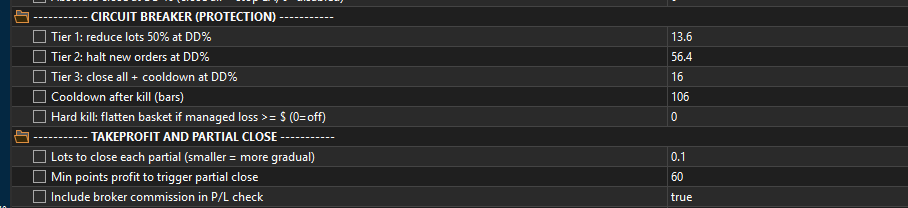
F7 inputs panel: Circuit breaker protection and takeprofit and partial close
F7 → CIRCUIT BREAKER (PROTECTION) + TAKEPROFIT AND PARTIAL CLOSE
Input
Default
What it does
Tier 1: reduce lots 50% at DD%
InpCBTier1
4.0
Tier 1: past this equity DD % (of the equity high-water mark), lot sizes are halved.
Tier 2: halt new orders at DD%
InpCBTier2
6.0
Tier 2: halts new recovery orders.
Tier 3: close all + cooldown at DD%
InpCBTier3
10.0
Tier 3: closes the whole basket and starts a cooldown.
Cooldown after kill (bars)
InpCBCooldown
24
Bars to wait after a tier-3 kill before the EA rearms.
Hard kill: flatten basket if loss >= $
InpMaxLossMoney
0 (off)
Hard $ cap on the managed basket's loss: flattens everything. The protection to configure first.
Lots to close each partial
InpPartClose
0.01
Lots closed from EACH leg on every partial close.
Min points profit to trigger partial close
InpTPPoints
10
Minimum distance in points the winning leg must have to be eligible. Controls WHEN a partial can fire. The net threshold of the pair is configurable with "Min NET $ a partial pair must book" (default +$0.10).
Include broker commission in P/L check
InpCommAware
true
Include broker commission in the P/L checks.
Allow overlap after N orders
InpOverlapAfter
2
Partial closes only start after N averaging orders.
Close whole basket at this PROFIT
InpBasketMoney
60
The whole basket closes when its combined P/L (swap included, commission too if "Include broker commission in P/L check") reaches break-even + this amount in $. Lower = exits closer to break-even.
Extra $ per basket lot on the TP target
InpBasketPerLot
0
New in v3.14. Scales the basket TP with the basket size: the exit target becomes max("Close whole basket at this PROFIT", this value x total lots). 0 = fixed $ target only.
Lock when avg count reaches N
InpLockAtOrder
0
New in v3.14. Arm the lock earlier, at averaging level N instead of only when the grid is exhausted. 0 = lock only at "Max average orders".
Min NET $ a partial pair must book
InpPartMinNet
0.10
New in v3.14. The net $ the pair (winning leg + losing chunk) must book for the partial close to fire. Default +$0.10 = only net-positive pairs (v3.12 rule). A negative value (e.g. -2) enables AW-Recovery-style gradual reduction: the EA books small capped net losses per pair to keep shrinking the losing side.
C

Recovery grids and average orders + Smart ATR

The ladder itself: how big each averaging order is and how far apart they sit. In REC_ATR and REC_KALMAN modes the step is ATR × multiplier instead of fixed points.

F7 inputs panel: Recovery grids and average orders and smart ATR settings
F7 → RECOVERY GRIDS AND AVERAGE ORDERS + SMART ATR SETTINGS
Input
Default
What it does
Lot progression mode
InpLotMode
GEOMETRIC
Lot progression: GEOMETRIC (× multiplier), FIBONACCI, or FIXED (same lot every level).
Volume of first average order
InpAvgLot
0.05
Volume of the first averaging order.
Multiplier to volume
InpAvgMult
1.5
Multiplier applied to the volume per level.
Step for average orders (points)
InpStep
200
Step between averaging orders, in points.
Multiplier to step
InpStepMult
1.0
The step grows × this per level (1.0 = constant step).
Max average orders
InpMaxOrders
6
Maximum averaging orders; at the cap the lock is evaluated (if "Lock basket at max DCA level").
ATR Period
InpATRPeriod
14
ATR period.
ATR multiplier for step
InpATRMult
1.5
Grid step = ATR × multiplier (REC_ATR / REC_KALMAN modes).
ATR Timeframe
InpATRTF
D1
ATR timeframe.
D

Kalman filter + Manual trading

The Kalman trend filter only gates new initial entries — it never blocks DCA orders, closes or locks. The manual-trading group controls the Buy/Sell pad on the chart panel.
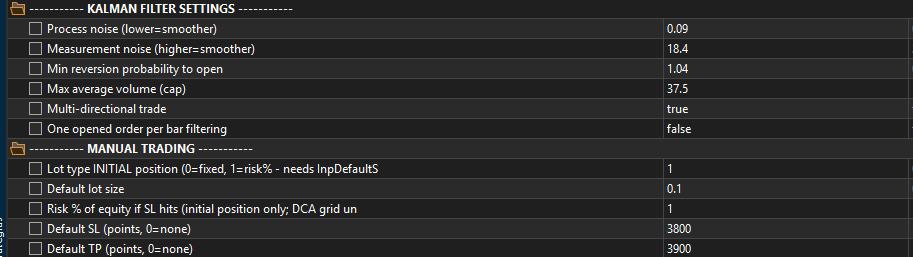
F7 inputs panel: Kalman filter settings and manual trading
F7 → KALMAN FILTER SETTINGS + MANUAL TRADING
Input
Default
What it does
Process noise (lower=smoother)
InpKalmanQ
0.05
Process noise of the Kalman filter.
Measurement noise (higher=smoother)
InpKalmanR
2.0
Measurement noise of the Kalman filter.
Min reversion probability to open
InpKalmanMinProb
0.4
Minimum reversion probability to allow a new INITIAL entry. Never gates DCA, closes or locks.
Kalman filter also gates DCA adds
InpDcaKalmanGate
false
New in v3.14. true = each averaging add must also pass the Kalman slope filter (no averaging into a strong counter-slope). Default false - backtests show gating the adds HURTS the recovery performance.
Max average volume (cap)
InpMaxAvgVolume
5.0
Per-order volume cap for averaging orders.
One opened order per bar filtering
InpOnePerBar
true
At most one averaging order per bar.
Lot type INITIAL position
InpLotType
0
Manual pad initial position: 0 = fixed lot; 1 = risk % of equity (requires "Default SL (points)" > 0).
Default lot size
InpLotSize
0.1
Default lot for the manual pad.
Risk % of equity if SL hits
InpRiskPct
1.0
Risk % of equity if the SL hits. Manual initial position only; the DCA grid does not change.
"Default SL (points)" / "Default TP (points)"
0 / 0
Default SL/TP in points for manual pad entries (0 = none).
Max spread to open
InpMaxSpread
0
Max spread to open from the pad (0 = no filter).
Magic number
InpMagic
0
Magic number of the manual pad orders.
Fit manual lot to free margin
InpFitMargin
true
true = shrink the manual lot to fit free margin; false = reject the order instead.
E

Protection settings + Telegram

Execution hygiene (slippage, spread, rollover) and the optional notifications. Telegram uses your own bot token and chat ID and requires whitelisting api.telegram.org in Tools → Options → Expert Advisors; with both fields empty the EA is fully functional and sends nothing.

F7 inputs panel: Protection settings and Telegram
F7 → PROTECTION SETTINGS + TELEGRAM
Input
Default
What it does
Max slippage (points)
InpMaxSlippage
30
Max slippage in points.
Max spread protection for DCA adds (points)
InpMaxSpreadProt
7500
Max spread for DCA adds, in points.
Block new entries around daily rollover
InpRolloverGuard
true
Blocks new entries around the daily rollover (23:55–00:10 server time). Management is never blocked.
Max spread (points) for new entries
InpMaxSpreadEntry
100
Max spread for new entries, in points (0 = off). Only affects new entries; management is never spread-filtered.
Enable Telegram notifications
InpTelegram
true
Telegram notifications on/off (requires the api.telegram.org whitelist).
"Bot Token" / "Chat ID"
empty
Your own bot token and chat ID. Empty = nothing is sent.
F

Panel + Strategy Tester

The last group is tester-only: these inputs never act on a live or demo account. They exist so you can watch a full recovery cycle in the Strategy Tester — details and the honest disclaimer in section 06.

F7 inputs panel: Panel and Strategy Tester settings
F7 → PANEL + STRATEGY TESTER
Input
Default
What it does
Show panel
InpShowPanel
true
Show the on-chart panel.
Auto-open losing trades in tester
InpTestAuto
true
TESTER ONLY: opens synthetic positions so you can watch a full cycle. Set false before any live or demo account.
Open trade every N bars
InpTestEveryN
50
Open a synthetic trade every N bars.
Tester: initial lot for the pad
InpTestLot
0.1
Synthetic trade lot (0 = reuse the manual pad lot).
Direction (0=random, 1=buy, 2=sell)
InpTestDir
0
Direction: 0 = random, 1 = buy only, 2 = sell only.
05

The on-chart panel, block by block

The EA draws a live dashboard on the chart (minimizable). This is what it looks like running inside the Strategy Tester with a cycle open:
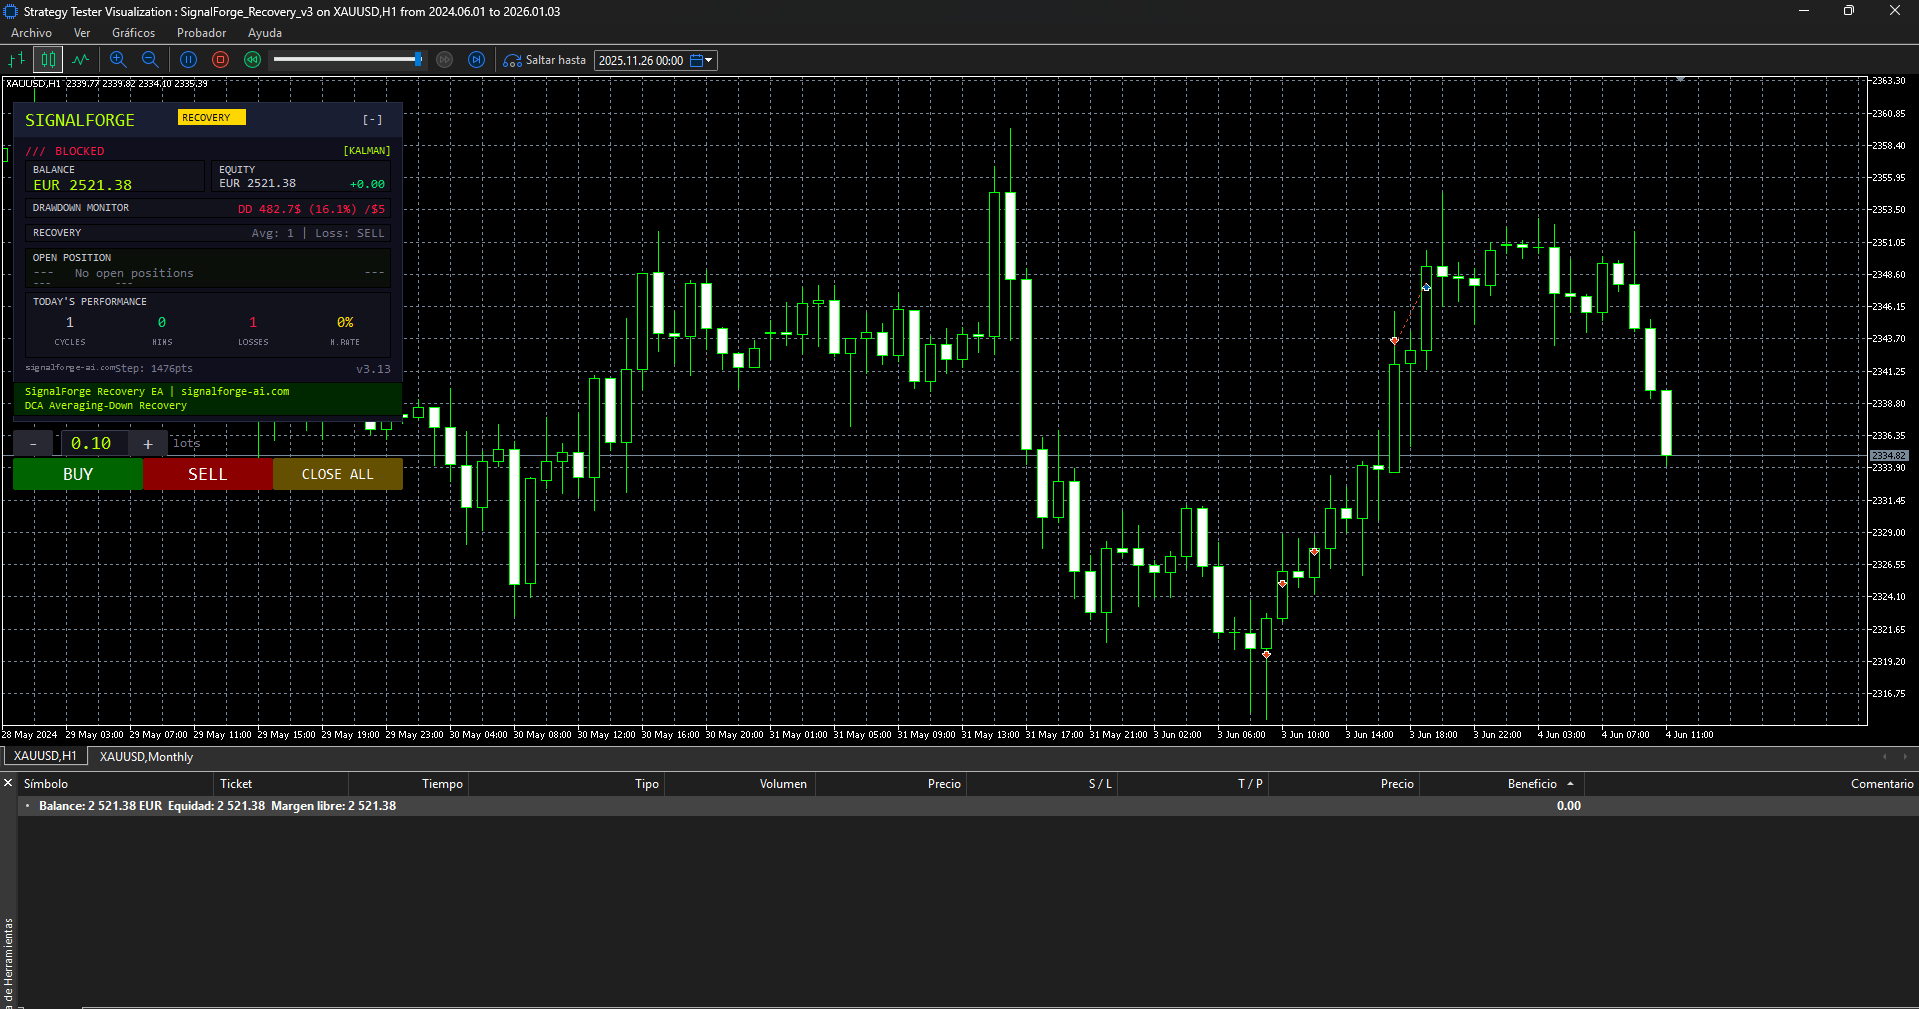
Strategy Tester visualization with the SignalForge Recovery on-chart panel
STRATEGY TESTER VISUALIZATION WITH THE ON-CHART PANEL
Block
What it tells you
State line
Whether the EA is armed, in a cycle, in cooldown or stopped.
Balance / Equity
Account balance and live equity of the account.
Drawdown monitor
Current equity drawdown vs the circuit-breaker tiers.
Recovery status
Averaging orders placed so far and which side is being recovered (the losing side, auto-detected).
Open position
The managed exposure: side, total volume and floating P/L of the basket.
Today's performance
Cycles closed today: wins, losses and win rate.
Step info
Where the next averaging order would trigger and at what volume.
Manual pad
Buy / Sell / Close All buttons with a lot field — for opening the initial position the EA will manage, or flattening everything yourself.

The cyan dashed line on the chart is the basket break-even (volume-weighted average of the DCA side); the basket exits at that break-even + "Close whole basket at this PROFIT". It has nothing to do with the partial closes.

06

The Strategy Tester demo — read this before trusting the curve

The free demo on the Market listing runs in the MT5 Strategy Tester. With "Auto-open losing trades in tester"=true the EA opens synthetic positions only inside the tester (cadence: every "Open trade every N bars" bars; lot: "Tester: initial lot for the pad"; direction: "Direction (0=random, 1=buy, 2=sell)" 0=random / 1=buy / 2=sell) so you can watch full recovery cycles end to end.

Honest disclaimer

Those entries are generated by the EA itself, not by a strategy. A tester equity curve is therefore "synthetic entries + this manager" — it shows how the recovery mechanics behave, not a promise of profit. Always set "Auto-open losing trades in tester"=false before any live or demo account, and run your tester pass on a NETTING demo account (recommended).

And the DCA honesty note, because it matters more than any setting: averaging down increases exposure while losing. It converts many small losses into fewer, larger ones. Size the grid and the hard cap ("Hard kill: flatten basket if loss >= $") so that the worst cycle you allow is a loss you accept — before the first cycle starts, not during it.

FAQ

THE FIVE QUESTIONS EVERY NEW USER ASKS.

Does SignalForge Recovery open trades on its own?

No. It is a position manager with no entry signal: it watches positions you already opened (manual trades, or other EAs via their magic numbers) and manages them in drawdown with an averaging-down cycle. The only exception is the Strategy Tester, where "Auto-open losing trades in tester" opens synthetic positions so you can watch a full cycle — those entries are generated by the EA itself, not by a strategy.

Do I need a hedging or a netting account?

Hedging is recommended for live use: the lock ("Lock basket at max DCA level") and the pair-based partial close both need opposite positions to coexist. On netting accounts the lock is auto-disabled and the pair-based partial close is disabled too, because netting merges positions into one. For the Strategy Tester demo pass, a NETTING demo account is the recommended choice.

Can I choose which side the EA recovers?

No. At launch the EA auto-detects the side with the bigger floating loss and averages only that side; positions on the opposite side are consolidated (closed) at launch. When a cycle ends (basket TP, money stop or circuit breaker), the EA rearms and the next cycle re-derives the side from scratch.

What is the cyan (blue) dashed line on the chart?

It is the basket break-even: the volume-weighted average price of the DCA side. The whole basket closes when its combined P/L reaches that break-even plus "Close whole basket at this PROFIT". It has nothing to do with the partial closes.

Do I need Telegram for the EA to work?

No. Telegram notifications are optional and use your own bot token and chat ID (with api.telegram.org whitelisted in Tools → Options → Expert Advisors). With both fields empty the EA is fully functional and simply sends nothing.

Keep reading

The product landing covers what the EA is, the three recovery modes and how it compares to AW Recovery and the old MT4 recovery tools: SignalForge Recovery EA (MT5). If you are weighing AW Recovery specifically, see our AW Recovery alternative guide for MT5.

Author

Benjamin SF is the founder of SignalForge and an expert in trading algorithm automation. He builds and operates the SignalForge bridge for prop-firm traders and maintains its public latency benchmark (187 ms median).

Recover your drawdowns with rules, not hope

SignalForge Recovery v3.24 on MQL5 Market: $30 one-time purchase, free Strategy Tester demo, no subscription, no token.

SignalForge Recovery is a position-management tool. It does not provide investment advice or entry signals. Averaging down increases exposure while losing; it converts many small losses into fewer, larger ones. Trading involves risk of loss.